Modeling and Rendering a Car in Blender and Photoshop
In this tutorial, We will be Modeling Lotus Elise car using Blender, we will do amazing studio lighting and rendering with Blender’s Cycles render engine.
We will do little bit of compositing inside Blender’s compositor and some final effects and post processing in Photoshop. Fire up Blender and let’s get started.
Final Result
Let’s see what you will be creating in this tutorial.

Modeling and Rendering Lotus Elise Car
Resources
- Lotus Elise + Studio HDRI by aXel
Setting up background images
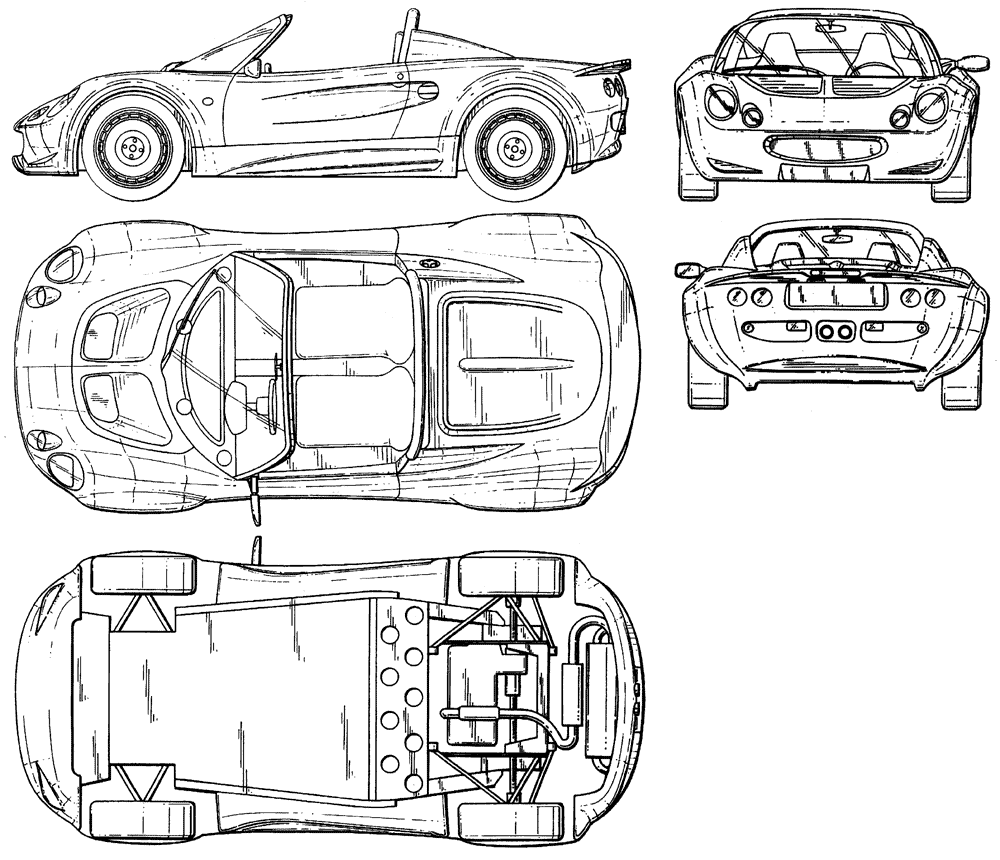
Go in front ortho view by hitting 1 on keyboard. You can toggle between ortho and perspective view with 5 number key. Hit N to open up property panel and check background images. Click Add image button and in blue print image of lotus elise you can find from google. Here is one nice image to use: lotus-elise-old.gif. This image is in .gif format. You can convert it to jpeg and png image by simple editing program like MS Paint. Choose axis to Front, Set X Y and size property according to the image below to centre the front view.

Add same image one more time, set it to right view and copy the settings according to image.

Add one more for the top view.

Steps to creating the image to be written here.


Modeling Body
Hit SHIFT+A and add in a plane in front view, Open tool panel by T and check align to view. Go in edit mode by pressing TAB and set it according to image.

Select top vertices by right clicking and hit E to extrude them few times and set them according to image below.

Do the same thing above rear tire.

Extrude 2 edges from rear side like image below:

Extrude couple of time and connect it with front side. Select vertices you want to connect and hit Alt+M to merge them.

Select upper edge and extrude it according to the image.

Extrude it couple more time and select the lower part shown below. You can use circular select tool by pressing C key to select multiple vertices.

Go in front view and drag those vertices according to background image.

Set extruded edges according to blueprints from top view.

Select 6 faces around the hole we want on front part part of the body.

Extrude and scale them down. Extrude again and drag them on z axis to create a hole.

Use same technique on rear side of the car to create holes for headlights and other design.

Add extra edges and drag them according to blueprint for creating curves. To exclude parts like doors body, select vertices and hit P and choose selection to make them separate object.

After doing those steps, you will have something like image below. Go in modifier panel and add sub-surf modifier. Check optimal view. Screenshot shows distribution of edges according to curves of body.

Add mirror modifier above sub-surf modifier, choose merge and clipping. Now you have a nice body of car.


Adding Tires and Extra details
Modeling tire may take another long tutorial. So I will not be covering it here. And many people avoid modeling tires as you can find many free tires model on internet. You can use one from Blendswap.com by malcolm. It is a very nice wheel model by Malcolm and distributed under CC-BY license so we can use it without any issue. Modeling tires will use pretty much the same technique except the outer cage. Here is a view of tire I am using.

Rest of the aprts like grills and headlights can be created with basic shapes like box and planes. Add array modifier to create copies of them.

Glasses are also simple planes with slight curve on them. Always apply sub-surf modifier for smooth look.

After getting all the details together , you will have your car ready to go for material stage.


Setting up Materials and Basic light
Add in a plane and extrude few times. Model it from side view and make it curved. Add sub-surf modifier. Now we have a nice backdrop plane like studio.

Add a simple plane right above the car, make it of the same size as car.

From the top panel, choose Cycles render from drop down menu.

Add a material after selecting the plane, change the surface type to Emission. Make the strength 5. We have just created a basic light with this plane.

Choose backdrop plane and add in another material, choose diffuse as surface and choose a dark sky blue color.

Change the mode from solid to rendered from the lower panel. Now your scene is ready to test out your material results.

we will be using a car paint shader created by blazraidr, he has shared this nice car paint material. You have lots of control over the look with this material. I have created a modified version of this material for our use, you can download it from here: dropbox.com

We have to merge this material into our scene by choosing append from file menu.

Locate downloaded material file, go into material folder and choose car paint material.

To create the rest of the material you may want to open node editor. Material can be created with two methods in Blender cycles.

Here is the tire material setting in both panel and node editor. Choose mix shader, select diffuse and translucent for both shader input. Choose factor value of about 0.3 to create rubber look.

We will use same technique to create material for rims, we will use mix of glossy and diffuse shader for metallic look.

Glass shader is pretty similar, Mixed with glossy shader for reflections.

Plastic for grills and other extra stuffs is also created with mix of glossy and diffuse. But we have to use low roughness value on glossy shader for plastic look.

Chrome material for headlight and other thing is very simple, it just glossy shader with white color and 0 roughness.

Material for breaks and disc inside tire is mixed with a noise texture in displacement input. You can add niose texture by hitting Shift+A and choosing texture from add menu.

Logo on rims and on bonnet of the car require logo texture of lotus. It can be found with google. Add a cylinder, go to front view, in edit mode, you can either choose smart UV project or project from view by pressing U after selecting all vertices with A. Set scale with texture opened in UV image editor.

Add camera from add menu, hit 0 key to go to camera view. And pick a nice view. You can navigate for a nice view and then hit Alt+Ctrl+0 to snap the camera to that view. Go to camera tab, choose 35 mm lens, Check limits and tile safe, It will help you keep the target car in centre.

At bottom of camera panel, you will find depth of field property, choose distance value so that + sign hits the front of the car. It will be focus point and background objects will be blurred in render to give us a nice Depth Of Field effect.


Lighting And Rendering
Go to World tab, hit use node button there, on surface input, choose background, and choose Environment texture in color input.

Choose this HDRI map: via Dropbox.com It is created by me to give nice studio lighting effect. You can find many studio HDRI for free on internet or you can buy them.

Go to render panel, choose resolution you want, choose output folder and format. png is what I used always.

If you have nice GPU and you want to use that for rendering, you can go to user preferences from file menu. Go to System tab and choose CUDA in computing device selection. OpenCL is not yet supported so it will work only on CUDA cards.

After selecting CUDA, in render panel, you can choose Device to GPU from CPU. Nice GPU can do faster rendering then CPU.

Under sampling, choose about 1000 passes for noise free render. 500 is enough but choose larger value, we can stop rendering by hitting Esc key anytime we think rendering is satisfying. In Light pathm choose Full Global Illumination. Check No caustic for faster rendering.

Once the rendering is done, you can open node editor again for compositing. This time, instead of choosing material, choose render layers icon from lower panel of node editor.

From add menu, choose Render Layers. Check Use nodes if its unchecked in lower panel.

Add Viewer and Composite node from output menu.

Add glare node two times from filter category in Add menu. Connect them with settings as shown in the image by left clicking and dragging nodes from outputs to inputs. Hit N to open property panel and choose Backdrop to see the result in background. You can set zoom level right below the Backdrop option.

Save both images, original render and composited image. Open them in Photoshop. Keep composited layer above the original render and choose lower opacity of above layer if you want to reduce glare effect.

Add a curve adjustment layer from layer menu, make slight changes in midtones and shadows.

Add a Hue and Saturation adjustment layer, increase saturation a bit for nice look.

Finally, merge all the layers and go to filter menu, choose Lens Correction there. Go to custom tab in lens correction window, and choose vignette amount of 30-45 for nice focus on the car. And now you have the nice final image.


Final Result
This is the final result. I hope you enjoyed reading this tutorial.
Conclusion
As difficult as it looks I’m very sure if you follow this tutorial you will find a lot of help using your skills to produce your own creation! Ones again Thank you for using our tutorial, we will be very happy to answer any questions that you may have, You can simply leave a feedback and or a comment bellow.
Really very detailed, great share this.
The final result is so cool <3
I think it is a very long proses and hardy way.
Thanks.
Thank you for taking your time writing this. Am sure its of much help to noobs like me who cant afford to watch videos for in a cafe when u go to try at home u already forgoten something. God bless u.
Jay Adrianna always provides great posts:) I love the details on this one!
he didn’t use his own model, he used my model at blendswap . check this out http://www.blendswap.com/blends/view/21983 . this file under Creative Commons Attribution 3.0. he should add a credit to the owner .
That explains the huge jump between step 17 and 18. I agree he should give credit I assumed he made it.
Hi,
I use http://www.blendswap.com/blends/view/40121 which gives credit the the resource you are talking about above. I have 100% rights to using the mentioned resource.
Thanks
the resource that you mentioned above is base of my model. you should give a credit to both of them, me and bhavin sholanki. btw, i didn’t see any credit in your tutorial.
I was following this tutorial, and I noticed that the blueprint is of Lotus Elise from the year 2000 or earlier, and the final render shows a Lotus Elise 2001 or later version. From searching images on Google, I found out that there was a dramatic change in design between these two. You should have realized this when you imported the external model, and should have notified somewhere. When you are encouraging people to follow your tutorial, you should be really careful with these things. I wasted so much of my time, not sure why my model was beginning to look like a car, but the features were very different compared to the image in the tutorial.
I lost you at step 9 because it appears the model is no longer flat and has raised areas…
You are a fraud, pretending you had anything to do with the making of this car, the garbage you present up to step 17 suddenly becomes a professional looking model at step 18.
You are attempting to show how this car was modeled yet you have no idea how it was made, I suggest it is impossible to get the finished job from the crap you have offered, the vertices are totally different.
Why dont you grow a set and admit that you cant offer a modeling tutorial of this car because it is beyond your abilities, and respect the creator of this model and attribute the design to that person.
I feel cheated.
hy, thanks for share this tutorial, im learnig and working on it.
but i have some problem in part 11th on this tutorial, can you explain more abaout this.
thankyou for your sincerity
Good blog post !!This blog is vary useful for me!! I was unaware of much of what you wrote about in your article. Your information was very helpful and I hope others feel the same. Wonderful work.
there are… awesome,.. tutorial for modelling and rendering car in.. blender…. this tutorial is better than all.. tutorials…. i ill rate them with five.. stars… (*) (*) (*) (*) (*)
thankyou..guys.. for this post…. i request you to please…. post more tutorial of blender like.. this one….
B-)
Can anyone tell how to do 12 and 13????
Could you do a rendering on a benz W 111 fintail four door,with forward slanted headlights from top keeping with the fender lines,forward slanted and lengthened grille, air exit from the fender the rear is up to you this car will be built.